One of the most common questions we hear from RV owners is:
“What sealant should I use on my RV?”
It sounds like a simple question, but the answer isn’t always as simple as grabbing a tube that says “RV Sealant” on the label.
Your RV has many different seams, openings, moldings and components that must be sealed against water intrusion. Depending on where the sealant is being applied, the surface material, the RV manufacturer’s requirements and the type of existing sealant, different products may be appropriate.
At California RV Specialists in Lodi, California, we work with RV sealants and water-intrusion repairs every day. We also stock RV sealants and maintenance products in our RV Parts & Accessories Store and have displays and samples to help owners better understand what they’re looking at.
Before you start scraping and resealing your RV, here’s what you should know.
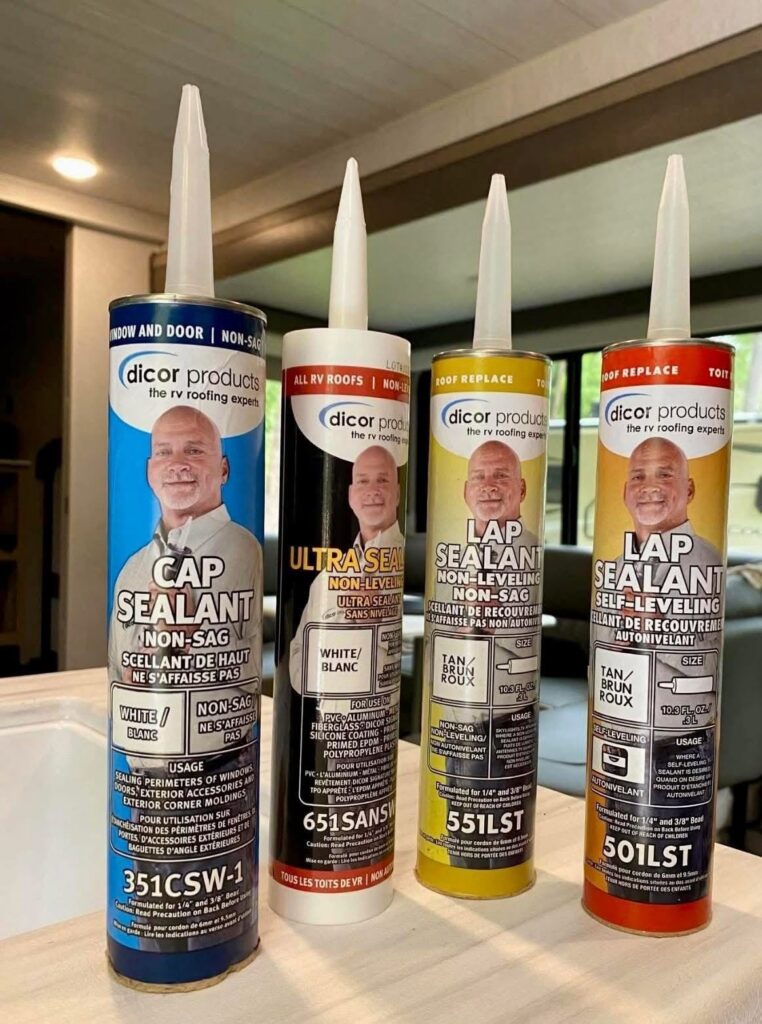
There Isn’t One Sealant for the Entire RV
Walk into an RV parts store or search online and you’ll find dozens of sealants, adhesives, tapes and coatings.
It’s easy to assume they’re interchangeable.
They’re not.
A product designed for a horizontal roof surface may not be appropriate for a vertical sidewall seam. A sealant used around a roof vent may behave very differently when applied around a window or exterior molding.
The material underneath also matters.
Your RV may incorporate materials such as:
TPO or EPDM roofing • Fiberglass • Aluminum • Painted surfaces • Plastic • Rubber • Metal moldings • Glass
Compatibility matters.
That’s why our advice is simple:
Know what you’re sealing before choosing the product.
RV Roof Seams
The roof is one of the most important areas to inspect regularly.
Depending on the RV, sealant may be found around:
- Roof vents
- Plumbing vents
- Skylights
- Antennas
- Solar mounting points
- Air-conditioning components
- Front and rear roof transitions
- Ladder mounting points
- Other roof penetrations and accessories
Many roof applications use a self-leveling lap-style sealant because it is designed to flow and spread across horizontal surfaces.
But don’t assume every roof uses the same product.
Before applying anything, determine the roofing material, existing sealant and manufacturer’s recommendations.
Using an incompatible product can create adhesion problems and make future repairs more difficult.
Vertical RV Seams
Vertical surfaces generally require a different approach.
Areas such as sidewall seams, exterior fixtures and vertical joints typically need a sealant that will remain where it is applied rather than flowing down the side of the RV.
Depending on the application, a non-sag or non-leveling sealant may be appropriate.
This is a good example of why grabbing the same tube you used on the roof isn’t always the right answer.
Horizontal and vertical applications can require different products.
RV Windows
Windows are another area where owners need to understand how the component was originally sealed.
Depending on the window and RV construction, the installation may involve butyl material, sealing tape, exterior sealant or a combination of products.
Simply running a bead of sealant around a leaking window may not correct the underlying problem.
If water is getting behind the window frame because the original sealing material has failed, the proper repair may require removing the window, inspecting the surrounding structure and resealing the assembly correctly.
And remember:
Where you see water inside isn’t necessarily where the water entered the RV.
Water can travel inside walls and structures before becoming visible.
RV Insert Molding & Exterior Trim
Many RVs use exterior aluminum or other moldings with screws underneath a vinyl insert.
That vinyl insert isn’t just cosmetic.
It helps protect the screws and mounting area from direct exposure to water and weather.
Over time, the insert can:
Shrink • Crack • Harden • Pull Out • Become Loose • Deteriorate from UV Exposure
We also commonly find loose hardware and areas where additional attention may be needed when servicing these moldings.
If water reaches the fasteners and penetrates through the screw openings, it can potentially enter the RV’s structure.
This is why maintaining moldings, inserts, fasteners and surrounding sealants is an important part of exterior RV maintenance.
Roof Vents, Skylights & Other Roof Penetrations
Every opening cut into an RV roof creates another potential location for water intrusion.
Roof vents, plumbing vents, skylights and similar components should be inspected regularly.
Look for:
- Cracking
- Separation
- Gaps
- Lifting edges
- Missing sealant
- Deterioration
- Previous repairs that are coming loose
- Damage around mounting hardware
Don’t simply continue adding layer after layer of sealant indefinitely.
Sometimes old or failed material needs to be properly prepared or removed before new sealant is applied.
More sealant isn’t always a better repair.
Corner Trim & Body Moldings
The corners and transitions of an RV experience movement while traveling.
The RV flexes. Temperatures change. Materials expand and contract. Roads create vibration and movement.
Over time, sealants around corner moldings, trim pieces, front and rear transitions and body seams can deteriorate.
Small openings may not look serious from the outside, but water doesn’t need a very large opening to find its way into an RV.
These areas deserve regular inspection just like the roof.
Don’t Forget Clearance Lights & Exterior Components
Some of the most easily overlooked potential water-entry points are small exterior components.
Depending on the RV, inspect areas around:
Clearance Lights • Tail Lights • Exterior Speakers • Cameras • Electrical Connections • Water Connections • Exterior Showers • Compartment Doors • Appliance Openings • Exterior Accessories
Owners naturally focus on the roof, but water intrusion isn’t limited to the roof.
Your RV’s entire exterior envelope needs maintenance.
Can You Put New Sealant Over Old Sealant?
Sometimes—but not automatically.
Before applying new material, the existing surface should be evaluated.
Ask:
Is the old sealant still properly adhered?
Is it cracked or separating?
Is there dirt, wax or contamination underneath?
Is the new product compatible with the existing material?
Is there evidence that water has already entered the RV?
Putting fresh sealant over loose, contaminated or failing material doesn’t necessarily fix the problem.
Surface preparation can be just as important as the product itself.
Don’t Assume Silicone Is the Answer
One of the mistakes we commonly caution RV owners about is simply reaching for household silicone because they’re familiar with it.
An RV isn’t a stationary house.
The exterior experiences UV exposure, heat, cold, vibration, movement and flexing while traveling.
More importantly, using an inappropriate product can make future preparation and adhesion difficult.
Before applying household caulking or another general-purpose product, find out what is recommended for that particular RV application.
Why Regular Sealant Inspections Matter
Sealant maintenance isn’t something you do once and forget about for the life of the RV.
Your RV lives outside.
Sun, rain, heat, cold, road vibration, movement and age all affect exterior sealants.
A small sealant failure can potentially become a much larger problem if water is allowed to enter the structure over time.
Water intrusion can contribute to damage involving:
Roof decking • Walls • Flooring • Insulation • Wood Structure • Interior Finishes
Catching a problem early is generally much easier than repairing extensive water damage later.
Not Sure Which RV Sealant You Need? Come See Us
This is where having a local RV parts store backed by an actual RV repair shop can be especially helpful.
At California RV Specialists, we have RV sealants, maintenance products, displays and samples that can help owners understand the different products and applications.
Instead of simply buying a random tube online because the description says “RV sealant,” come talk with us.
If possible, bring:
- Your RV year, manufacturer and model
- Pictures of the area you’re repairing
- A close-up of the existing sealant
- A wider picture showing where it’s located
- Information about the roof or exterior material
- Any known history of previous repairs
That information can help us point you in the right direction.
DIY or Have Us Take Care of It
We encourage RV owners to learn about their RVs and perform maintenance they’re comfortable doing.
But not everyone wants to climb onto a roof, remove old sealant or troubleshoot a suspected leak.
If you’d rather have someone inspect it, California RV Specialists offers RV roof and body seal inspections and professional resealing services.
If we identify areas needing attention, we can explain what we’re seeing and discuss the appropriate next steps.
Whether you want to do the maintenance yourself or have our technicians take care of it, we’re here to help.
Protect Your RV Before Water Gets In
You don’t have to wait until there’s a stain on the ceiling or a soft spot in the floor to start thinking about sealants.
Preventive inspection is the better approach.
Look up. Look around. Check your seams. Check your moldings. Check your roof.
And when you’re unsure which product belongs where, ask before applying it.
A $15 or $20 tube of sealant may be protecting an RV worth tens or even hundreds of thousands of dollars.
California RV Specialists LLC
RV Parts & Accessories • Roof & Body Seal Inspections • RV Resealing
200 S. Cherokee Lane
Lodi, CA 95240
209-263-7040
service@calrvspecialists.com
CaliforniaRVSpecialists.com
Serving the RV community since 2003.
Service • Repairs • Maintenance • Upgrades • Parts • Accessories
Experts You Can Count On.