By Dustin Simpson, California RV Specialists
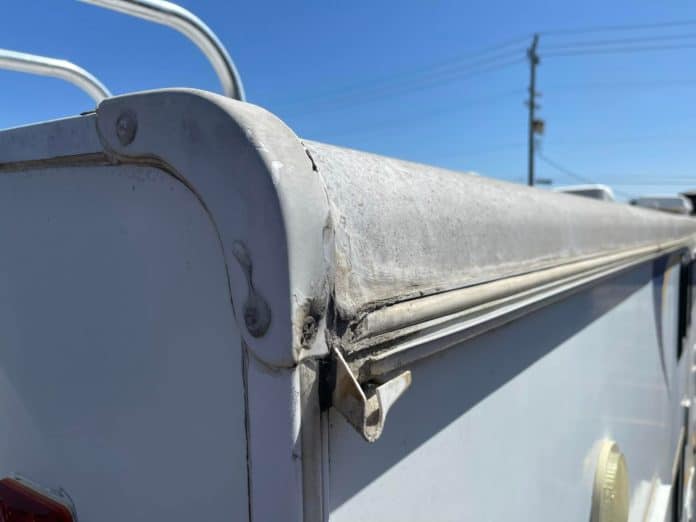
In my experience, one of the most missed items on an RV is the insert molding screw cover. This protective plastic covers the screws at the roofline edges as well as the vertical and horizontal side seams of all RVs.
Unless you visually inspect under the insert moldings, you will not see the potential for water damage until it’s too late.
What’s the point of insert moldings?
Insert moldings help to keep the moisture, condensation, rain, dirt and other elements out of your RV. By sealing the edges of the aluminum molding it protects the screws along the roof, body, front and rear seams. This is important and, from my experience, is often a missed step when weatherproofing and protecting your unit.
When water gets past this plastic insert molding screw cover, it can cause serious damage. Water spreads through the unit and invites the growth of mold and rusting screws, in addition to causing dry rot in walls, roof joints and floors as the water travels down the aluminum framework in the wall.
Do I need to replace it?
I recommend that you replace the insert molding as needed every 2-3 years.
Insert molding screw covers shrink in both directions and will allow water to get in. This shrinking is caused by age, sun, soaps and elements. The telltale sign is tapping it and seeing if it makes noise within the track.
Replacing the insert molding screw cover
Make sure when replacing the insert screw cover that you go back and tighten the screw just a little bit. If they are stripped out or not holding, you can replace them from a size #8 to #10. You can also add additional screws as needed in between the screws every 3 inches. All aluminum moldings are pre-drilled every 6 inches.
In many cases, we find that the moldings were cut during installation and the pre-drilled holes are missing, which means some screws were never added when the unit was built. This simple miss causes it to separate and allows water to damage your unit. I tend to overdo it and will typically install a second screw at the ends that I refer to as “toenails.” This helps keep the molding in place.
Additionally, I never tuck the insert molding cover behind at the ends. This traps the water and doesn’t allow it to drain. If this occurs, the molding collects dirt and mold within the screw cover.
When removing and replacing your insert molding, be sure to brush any dirt out of the tracks. When installing, I use a plastic scraper to tuck the edge in while feeding the trim into the molding. This will make it nice and easy to install. I like to add screws at the ends to secure the molding in place or use the corner caps.
What size insert molding do I need?
Insert moldings come in two sizes: 3/4” and 1”. In most cases, the 1” is used at roof lines, side wall edges and corner moldings. The 3/4” is sometimes used at entry doors and around compartment doors.
Don’t forget to check for insert moldings at slideouts’ side edges, drip rails and topper mounting rails.
I really hope this information is helpful to you to prevent damage. It will protect your investment.
DIY Products to use
- CRL Tapered Plastic End Stick Tool CRL216
- Kent Auto Body Cleaner
- Heavy Duty Vinyl Insert Trim, 1 inch Wide, 100 foot Roll, Black
- Heavy Duty Vinyl Insert Trim, 1 inch Wide, 100 foot Roll, White
- Heavy Duty Vinyl Insert Trim, 1 inch Wide, 100 foot Roll, Colonial
- Dicor Non-Sag Sealant — You will want to use non-sag sealant on all corners and side seams on the roof. Non-Sag Sealant is offered in several colors:
- White
- Black
- Grey
- Dove Bright White
- Tan
- Ivory
- Dicor Self Leveling Sealant – Roof surface, for moldings, seams, vents, skylights, ect.
- White
- Black
- Grey
- Dove Bright White
- Tan
- Ivory
- Accessory Installation Kit – Sealant, putty and scraper.
More from Dustin
Read more of Dustin’s articles here.
Dustin owns and operates California RV Specialists, an independent RV repair shop located in Lodi, CA. He thrives on sharing his knowledge and enthusiasm of RV repair and maintenance with his team, customers, and virtual friends.
Be sure to check out his YouTube channel where he shares what’s going on in the shop and the product offerings in the store. Dustin is also very active on Facebook. Join his group, RV Repairs and Tips – What’s in the shop!
Dustin proudly operates the business alongside his wife, Ashley; but the true pair that run the show are their Boston Terriers, Arvie and Hitch.
