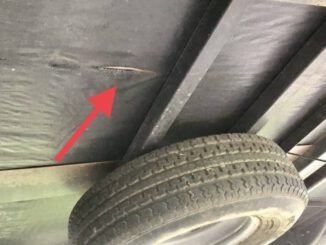
A small tear in your RV underbelly can quickly turn into a much bigger problem if left unrepaired!
Whether you’re traveling down the highway, pulling into a campground, or inspecting your RV after a tire blowout, damage to the underside of your recreational vehicle is more common than many owners realize.
At California RV Specialists in Lodi, California, we’ve seen everything from small punctures and loose underbelly panels to extensive damage caused by road debris, tire failures, and improper previous repairs.
One inexpensive product we recommend keeping in your RV maintenance supplies is RV underbelly repair tape, designed specifically for repairing tears and openings in compatible RV underbelly materials.
What Is an RV Underbelly?
Many travel trailers, fifth wheels, and toy haulers have an enclosed underbelly designed to help protect components underneath the RV.
The underbelly commonly consists of corrugated plastic material, often called Coroplast, or other protective panels installed beneath the frame.
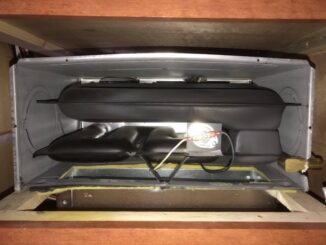
Depending on the RV’s construction, this area may contain:
- Fresh, gray, and black water holding tanks.
- Plumbing lines and drain connections.
- Electrical wiring and wiring harnesses.
- Heating ducts and insulation.
- Tank heating pads and related components.
- Other mechanical and electrical equipment.
Although an enclosed underbelly provides some protection against road debris and environmental exposure, it is not indestructible or necessarily waterproof.
What Causes RV Underbelly Damage?
One of the most common causes of underbelly damage is road debris.
Rocks, branches, tire fragments, and other objects can strike the underside of an RV while traveling.
Tire blowouts can be particularly destructive, sometimes tearing through underbelly panels, insulation, wiring, plumbing, and nearby body components.
Other causes include:
- Previous repairs requiring underbelly access.
- Improperly secured underbelly panels.
- Loose or missing fasteners.
- Animals or rodents damaging the material.
- Contact with road obstacles.
- Deterioration caused by age or environmental exposure.
Even a relatively small opening can become larger when exposed to highway airflow and vibration.
Why Ordinary Duct Tape Isn’t Always the Best Solution
When RV owners discover a torn underbelly panel, their first reaction is often to reach for a roll of ordinary duct tape.
Unfortunately, common household duct tape may not adhere reliably to certain underbelly materials, especially when the surface is dirty, textured, damp, or exposed to changing temperatures.
Over time, the tape may loosen or peel away, allowing the damaged area to reopen.
RV underbelly repair tape is designed for use on compatible underbelly materials, providing a more appropriate repair option for certain tears, seams, and small openings.
However, even specialty tape has limitations. Adhesion depends on the specific material, surface preparation, temperature, and application instructions.
- RV Underbelly Repair Tape: For compatible underbelly material seams and minor tears.
- Cable Ties & Proper Supports: For securing compatible wiring and plumbing without pinching or damaging components.
- Approved Foil HVAC Tape: For appropriate heating duct connections and repairs.
- Compatible Insulation: For replacing damaged insulation or improving coverage.
- Suitable Sealants or Foam: For sealing approved penetrations without interfering with moving parts, drainage, ventilation, or future service access.
How to Apply RV Underbelly Repair Tape
For minor tears or openings in an otherwise intact underbelly panel, repair tape may provide a practical solution.
Step 1 – Inspect the Damage
Determine whether the problem is limited to the protective panel or whether wiring, plumbing, insulation, or mounting components have also been damaged.
Step 2 – Clean the Surface
Remove dirt, dust, road grime, and other contaminants using a cleaner compatible with the panel and adhesive.
Step 3 – Allow the Area to Dry
Most adhesive repair tapes require a clean, dry surface for proper adhesion.
Step 4 – Apply the Repair Tape
Follow the tape manufacturer’s instructions, including any required overlap, minimum application temperature, and surface preparation.
Step 5 – Press the Tape Firmly
Apply even pressure across the repair area, especially along the edges, to promote proper adhesive contact.
Step 6 – Inspect the Completed Repair
Check that the tape is properly bonded and that the panel is securely supported. Reinspect the repair after travel.
For larger tears, a backing patch, additional panel support, or complete panel replacement may be necessary.
Why Every RV Owner Should Carry Underbelly Repair Tape
One of the biggest advantages of carrying underbelly repair tape is convenience.
Imagine discovering a small tear while preparing to leave a campground or inspecting your RV at a rest stop.
Having the correct material available may allow you to protect a minor opening before additional airflow and vibration make the damage worse.
Underbelly repair tape can also be useful after certain maintenance procedures that require temporary access to enclosed components.
Recommended RV Maintenance Product:
RV Underbelly Repair Tape – Designed for compatible RV underbelly panel repairs.
[INSERT AMAZON AFFILIATE PRODUCT LINK HERE]
Always select a tape compatible with your RV’s underbelly material and follow the manufacturer’s installation instructions.
When Underbelly Repair Tape Isn’t Enough
Not every underbelly problem can be corrected with tape.
If the panel is severely torn, sagging, missing fasteners, or damaged over a large area, a more extensive repair may be required.
You should also have the underside inspected if you notice:
- Water dripping from the enclosed underbelly.
- Sagging panels that appear to be holding water.
- Exposed electrical wiring or damaged plumbing.
- Missing or displaced insulation.
- Extensive damage following a tire blowout.
- Loose panels that may detach while traveling.
Covering an opening without identifying the underlying damage can conceal a more serious concern.
For example, a leaking holding tank or plumbing connection may allow water to collect above the underbelly panel. Simply taping the damaged material will not correct the leak.
Professional RV Underbelly Repairs
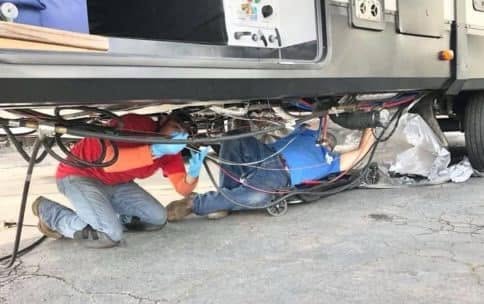
At California RV Specialists, we inspect and repair damaged RV underbelly systems, including protective panels, plumbing concerns, and related components.
Depending on the damage, repairs may involve removing underbelly material to access hidden components, correcting the underlying problem, replacing damaged sections, and properly securing the protective enclosure.
When an RV has experienced a tire blowout or road debris impact, we recommend inspecting the surrounding areas for additional damage that may not be immediately visible.
Inspect Your RV Underbelly Before Your Next Trip
A quick visual inspection of your RV’s underside can help identify problems before they become more expensive.
Look for loose panels, torn material, missing fasteners, exposed insulation, and anything hanging beneath the RV.
If you notice a damaged area, determine whether it can be safely repaired with appropriate materials or requires professional attention.
A small amount of preventive maintenance today can help avoid a much larger repair tomorrow.
Schedule Your RV Underbelly Inspection or Repair
California RV Specialists has been helping RV owners maintain, repair, and protect their recreational vehicles since 2003.
Whether you’ve experienced tire blowout damage, a leaking holding tank, or a damaged underbelly panel, our experienced technicians can help evaluate the problem and recommend an appropriate repair.
Don’t let a small underbelly tear become a major repair!
Contact California RV Specialists to schedule an inspection or discuss your RV underbelly repair needs.
Contact California RV Specialists
California RV Specialists – Independent RV Service & Repair Facility
Address:
200 S. Cherokee Lane
Lodi, CA 95240
Phone: (209) 263-7040
Website: www.calrvspecialists.com
Business Hours:
Monday – Friday: 8:00 AM – 4:00 PM
Closed for Lunch: 12:00 PM – 1:00 PM
Saturday & Sunday: Closed
Serving RV Owners Since 2003
Proudly serving RV owners throughout Lodi, Stockton, Galt, Elk Grove, Sacramento, Modesto, and surrounding Northern California communities.
We Don’t Sell RVs – We Repair the RV You Own!

If you have experienced either of these situations, you may be asking yourself, “Now what do I do about it?”
RV underbelly repair solution
The average person would grab a roll of duct tape. But did you know that very few tapes will stick to the underneath material of an RV, much less stick permanently? Duct tape will only work for a short period of time. If you want to eliminate taping the rips and tears in your underbelly repeatedly, I recommend you carry a small roll of underbelly repair tape with you. This underbelly-specific tape allows you to seal off any tears you may encounter. It has a permanent adhesive patch to cover up or protect the underneath of your RV. When placed over holes and tears, the repair tape bonds tightly to the bottom closure material PERMANENTLY.
Other repair possibilities you may encounter
- Your unit was accidentally cut by the manufacturer or by a repair that was needed.
- You may want to block off areas to prevent air, debris, or pests from entering the unit.

This product is very easy to use. Simply ensure that the area around the torn part is clean and dry before using the repair tape, and then stick the tape and press the edge of the tape firmly so that the tape can be tightly bonded to the bottom of your items.
Either way, you need to block off an open area, cover up or stop a tear before it catches the air and causes more damage. Make sure you have the right product on hand to make your undercarriage repair, whether you are on the side of the road or keeping up on general maintenance from the comfort of your driveway.
Make sure you check out Dustin’s website, California RV Specialists, and their YouTube channel for more helpful information.